
imPoster Developer Guide
v1.4b
Table of Contents
- Introduction
- Navigating this Developer Guide
- Design
- Implementation
- Documentation, logging, testing, configuration, dev-ops
- Appendix A: Product Scope
- Appendix B: User Stories
- Appendix C: Use Cases
- Appendix D: Non-Functional Requirements
- Appendix E: Glossary
- Appendix F: Developer Workflow
- Appendix G: API definition
- Appendix H: Instructions for Manual Testing
- Appendix I: Effort
Introduction
imPoster is a desktop application for beginners of API development to quickly grasp the basics.
imPoster’s simple and minimalistic style can help beginner API developers explore and test APIs, whether those found online or those that they have built themselves.
imPoster is also highly optimised fast typists and can be fully operated through keyboard commands.
This developer’s guide assumes its readers to have a basic understanding of APIs.
For a basic definition of what an API is, an appendix has been provided for readers who may be unfamiliar with the concept.
However, it is highly recommended for readers to refer to proper tutorial contents for the basics of APIs prior to developing the application.
Readers are also advised to download our latest releases from our main website in order to test out the application.
Navigating this Developer Guide
Before diving into the rest of the contents in our developer guide, the following are a few important syntaxes to take note of to facilitate your reading:
| Syntax | Description |
|---|---|
Markdown |
Denotes distinct classes, their methods or examples |
| Important things to take note of | |
| Keyboard | Keyboard actions |
Design
Architecture
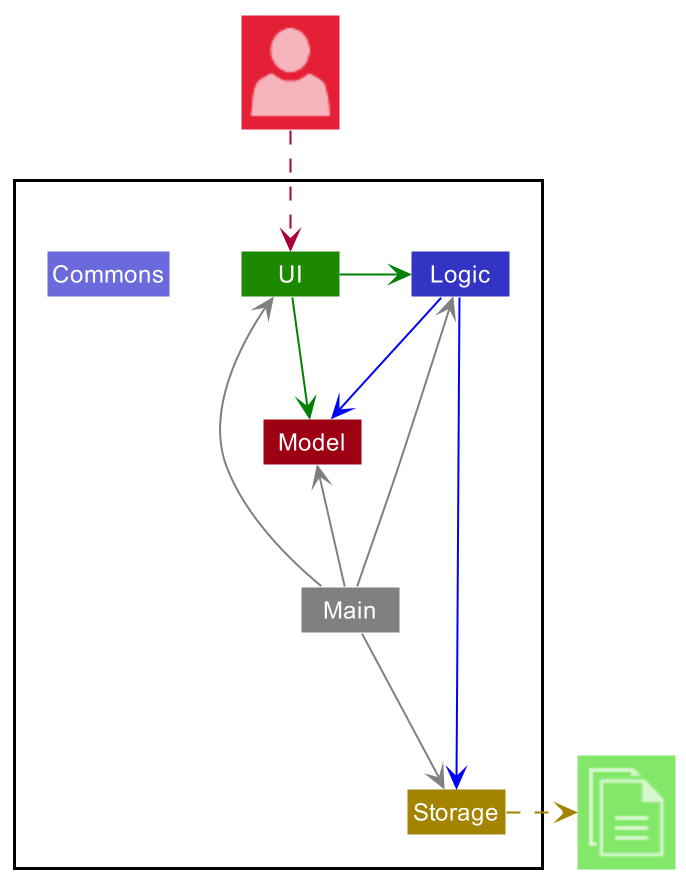
The Architecture Diagram given above explains the high-level design of the App. Given below is a quick overview of each component.
Main has two classes called Main and ImPoster. They are responsible for,
- At app launch: Initializes the components in the correct sequence, and connects them up with each other.
- At shut down: Shuts down the components and invokes cleanup methods where necessary.
Commons represents a collection of classes used by multiple other components.
The rest of the App consists of four components.
-
UI: The UI of the App. -
Logic: The command executor. -
Model: Holds the data of the App in memory. -
Storage: Reads data from, and writes data to, the hard disk.
Each of the four components,
- defines its API in an
interfacewith the same name as the Component. - exposes its functionality using a concrete
{Component Name}Managerclass (which implements the corresponding APIinterfacementioned in the previous point.
For example, the Logic component (see the class diagram given below) defines its API in the Logic.java interface and exposes its functionality using the LogicManager.java class which implements the Logic interface.
How the architecture components interact with each other
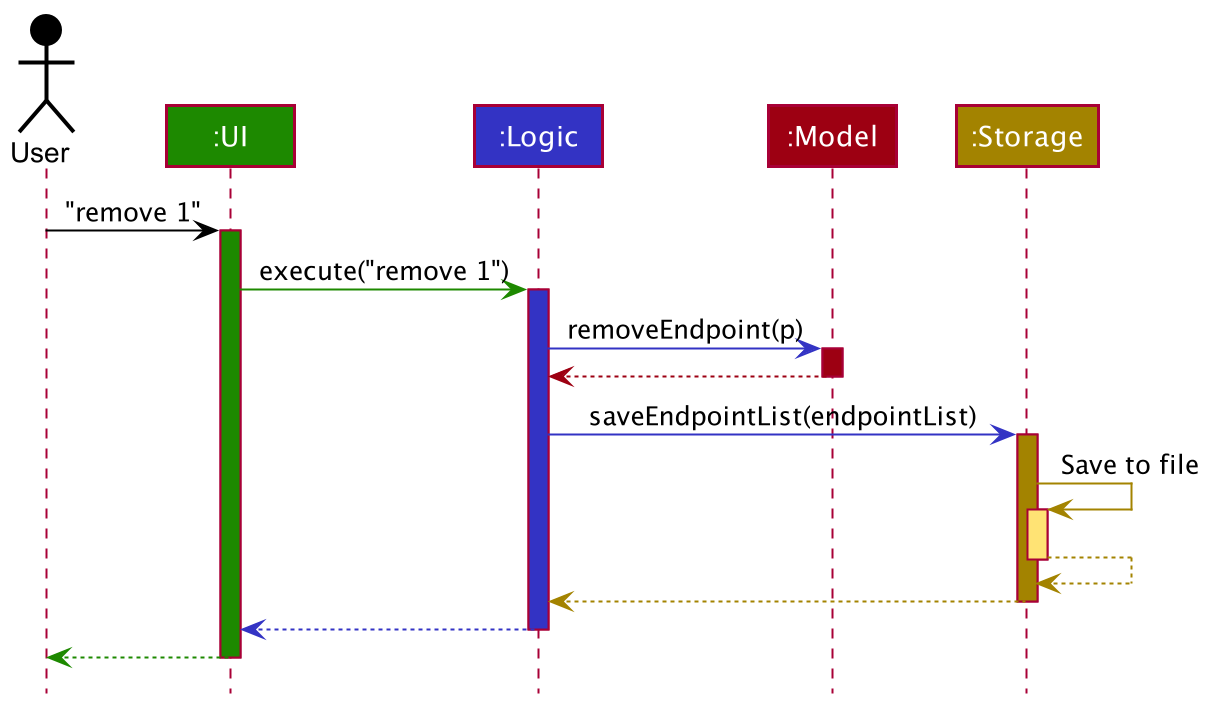
The Sequence Diagram below shows how the components interact with each other for the scenario where the user issues the command remove 1.
The sections on the next few pages will give more details of each component.
UI component
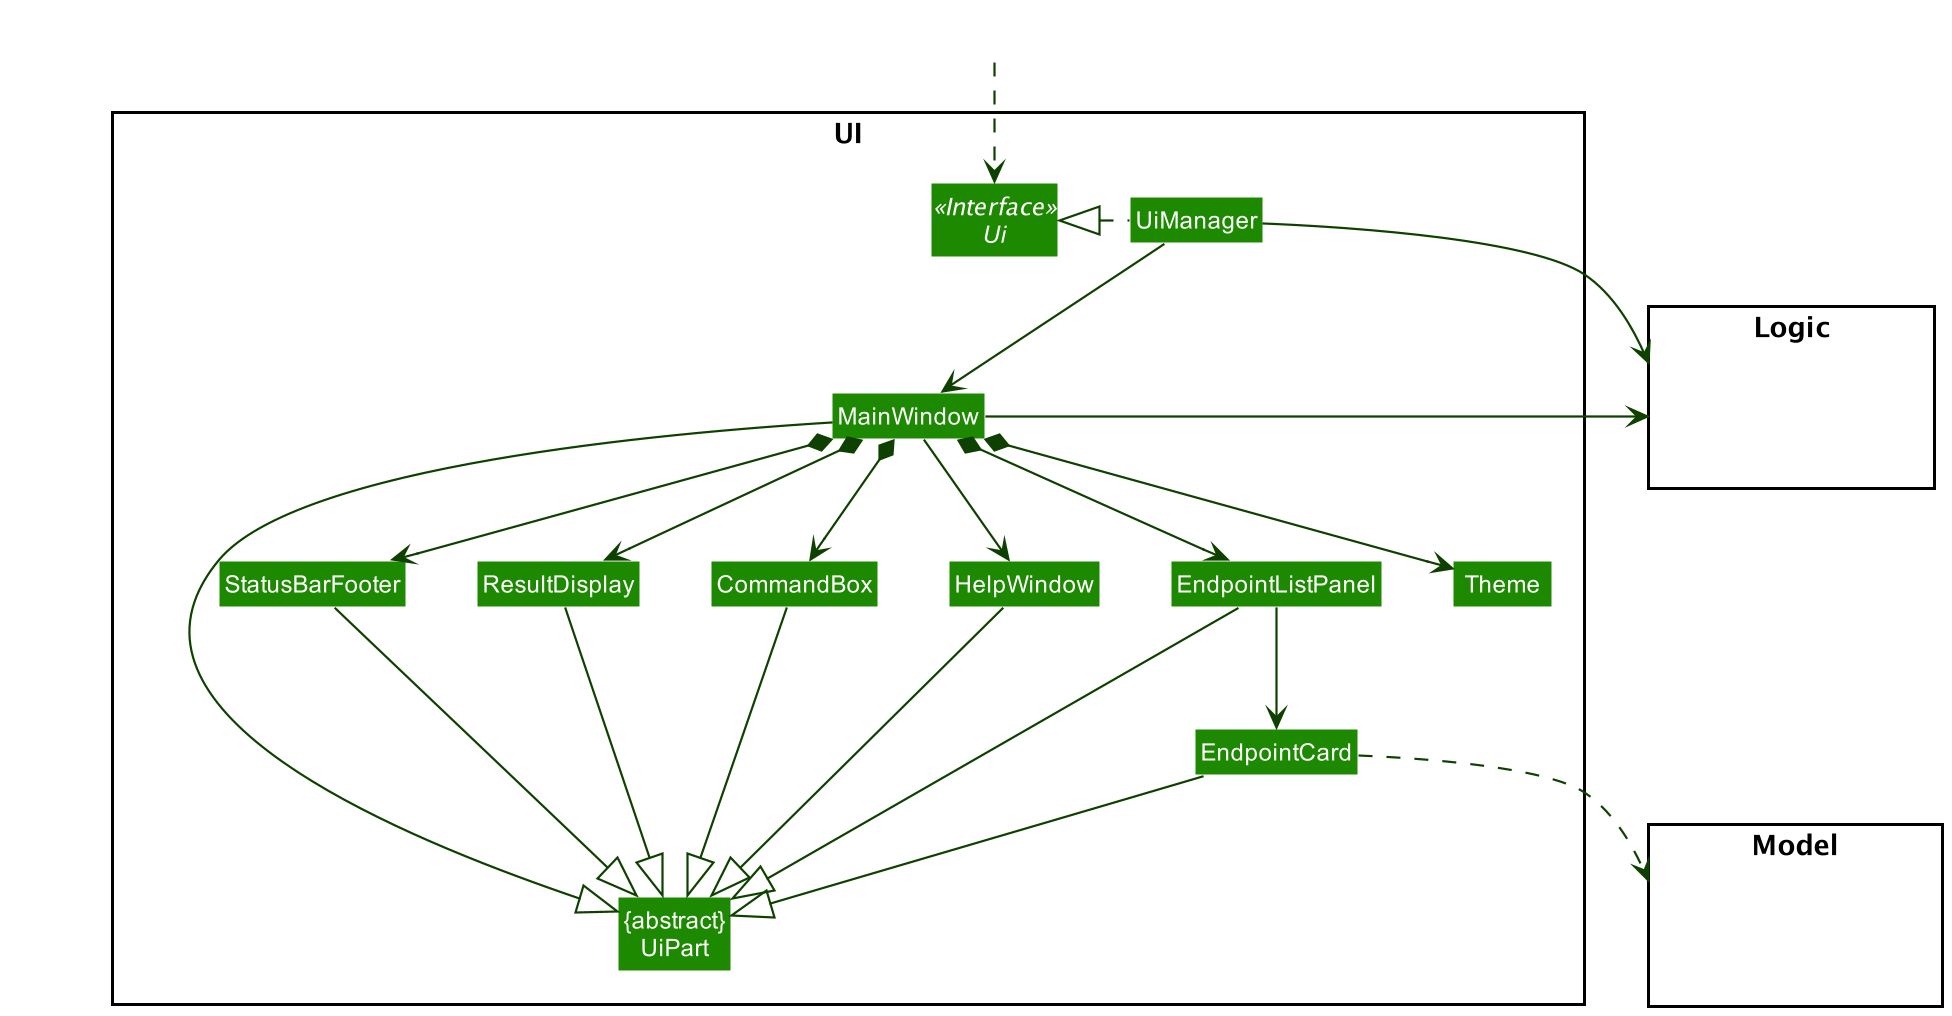
API :
Ui.java
The UI consists of a MainWindow that is made up of parts e.g.CommandBox, ResultDisplay, EndpointListPanel, StatusBarFooter etc. All these, including the MainWindow, inherit from the abstract UiPart class.
The UI component uses JavaFx UI framework. The layout of these UI parts are defined in matching .fxml files that are in the src/main/resources/view folder. For example, the layout of the
MainWindow is specified in
MainWindow.fxml
The UI component,
- Executes user commands using the
Logiccomponent. - Listens for changes to
Modeldata so that the UI can be updated with the modified data.
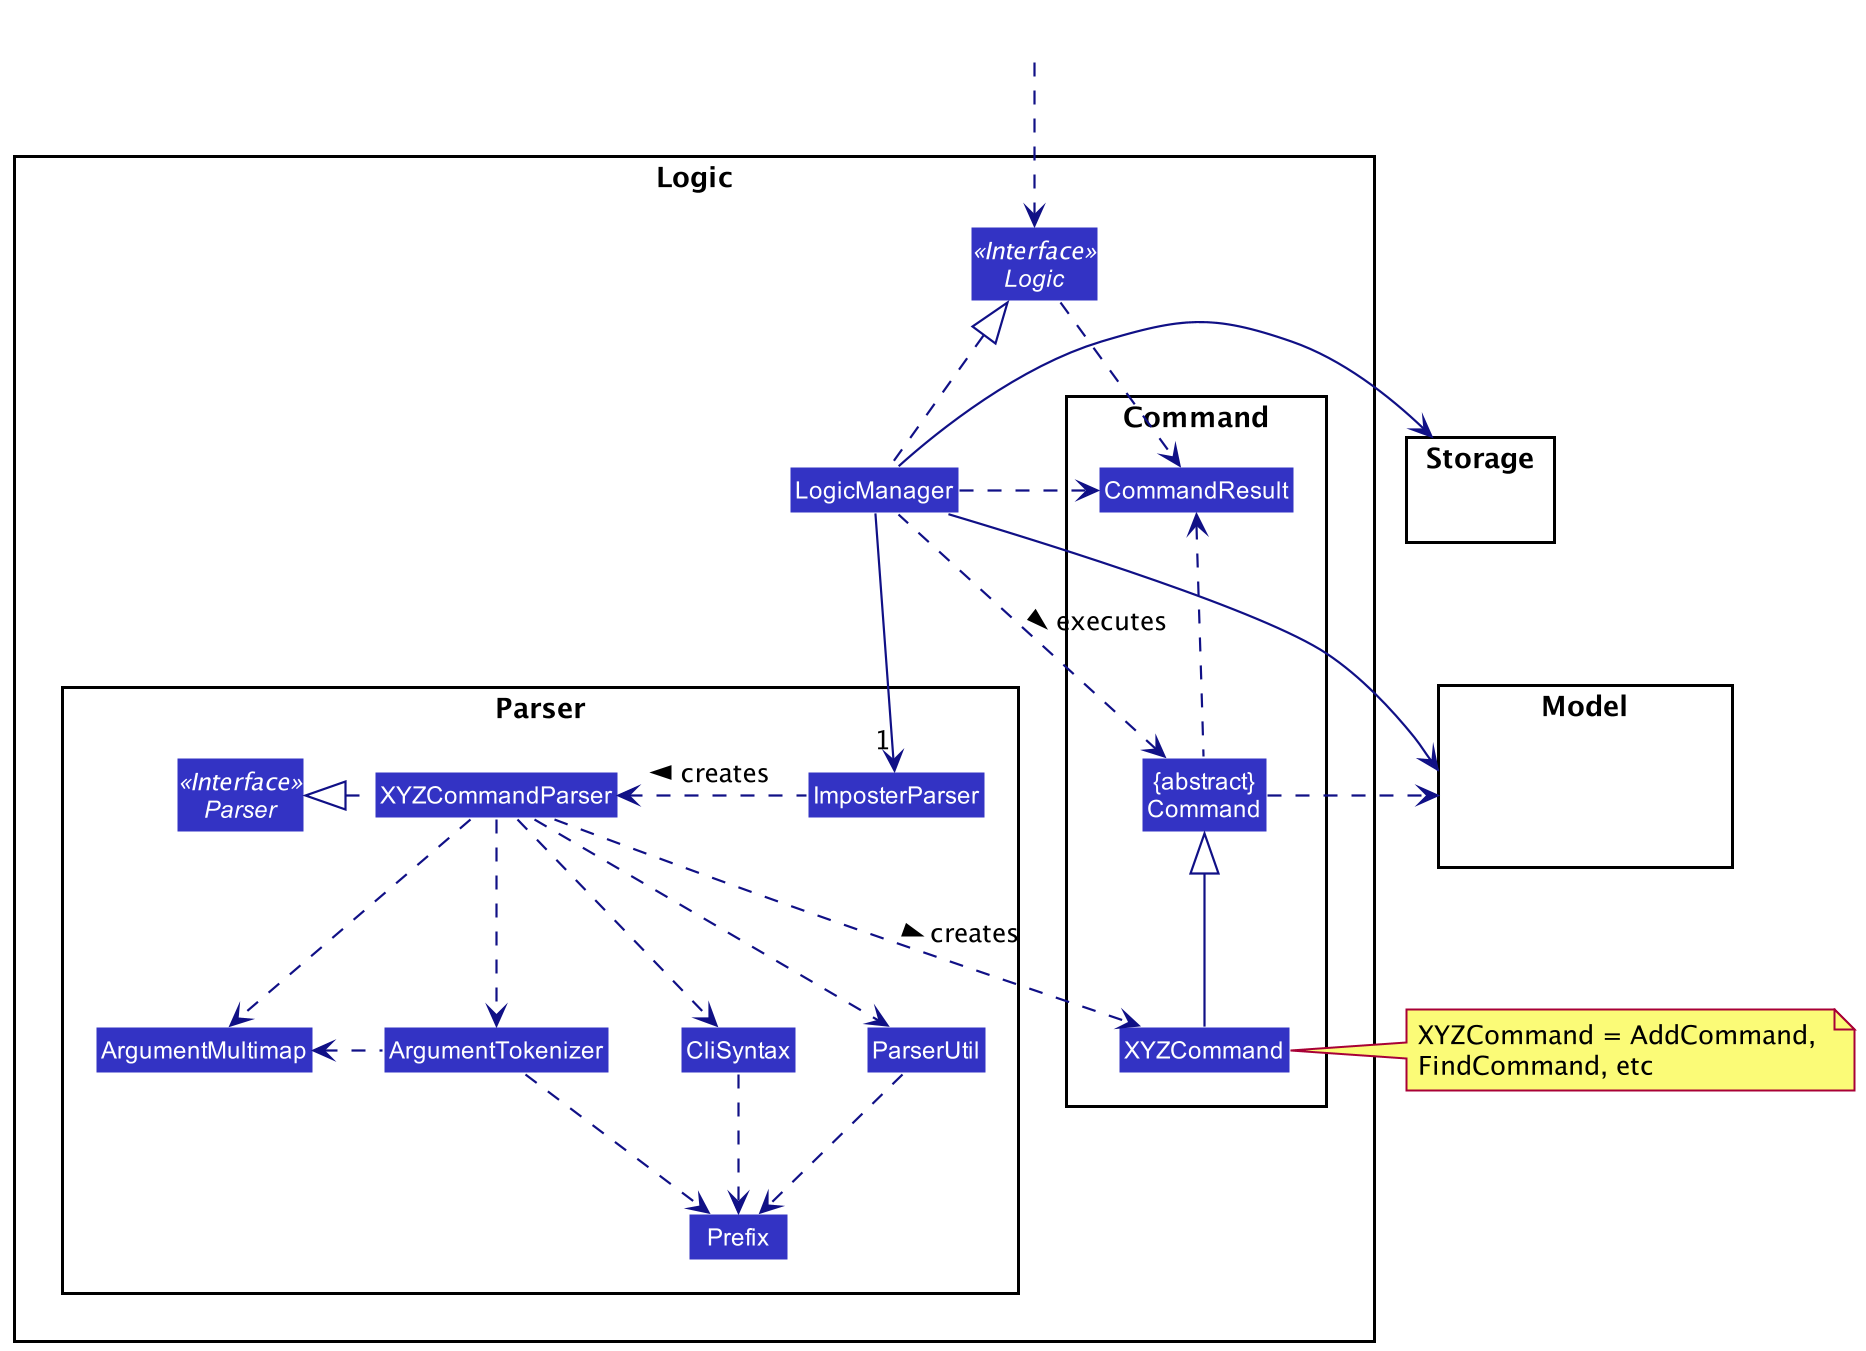
Logic component
API :
Logic.java
-
Logicuses theImposterParserclass to parse the user command - This results in a
Commandobject which is executed by theLogicManager. - The command execution can affect the
Model(e.g. adding a endpoint). - The result of the command execution is encapsulated as a
CommandResultobject which is passed back to theUi. - In addition, the
CommandResultobject can also instruct theUito perform certain actions, such as displaying help to the user.
Given below is the Sequence Diagram for interactions within the Logic component for the execute("remove 1") API call.
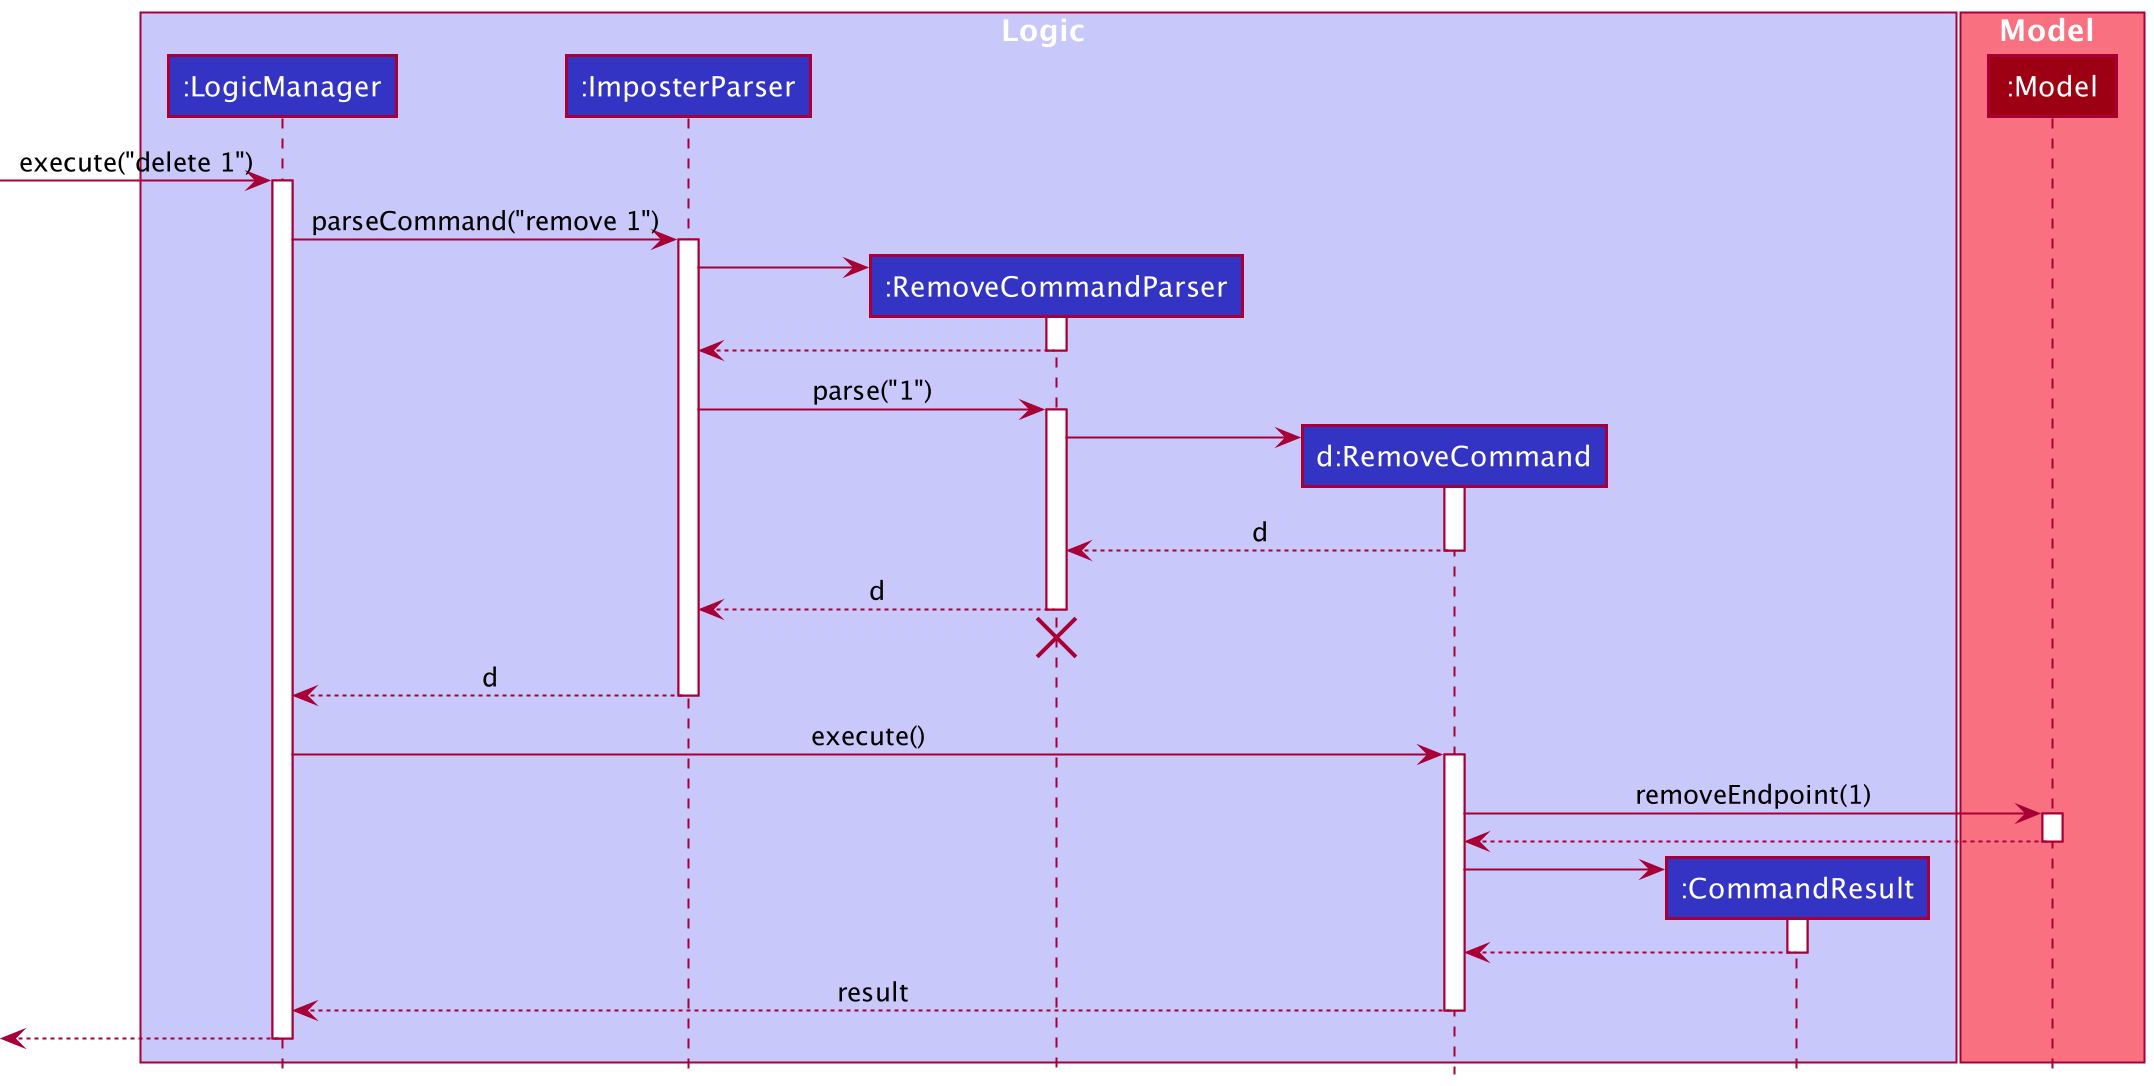
DeleteCommandParser should end at the destroy marker (X) but due to a limitation of PlantUML, the lifeline reaches the end of diagram.
Model component
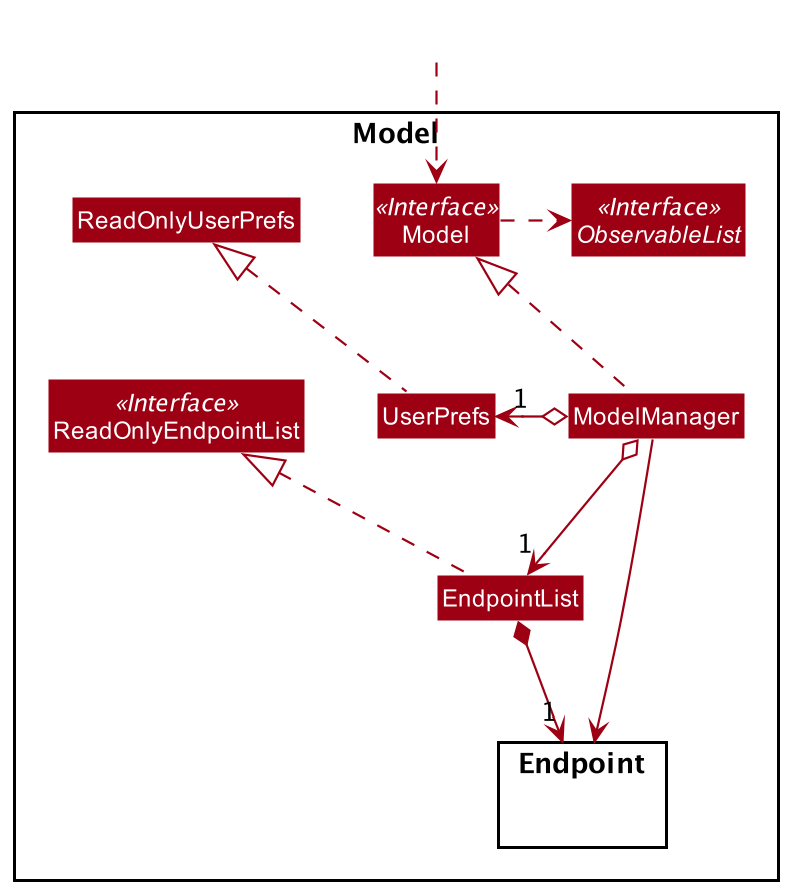
API : Model.java
The Model,
- stores a
UserPrefobject that represents the user’s preferences. - stores the Endpoint List Data.
- exposes an unmodifiable
ObservableList<Endpoint>that can be ‘observed’ e.g. the UI can be bound to this list so that the UI automatically updates when the data in the list change. - does not depend on any of the other three components.
Tag list in the imPoster, which Endpoint references. This allows imPoster to only
require one Tag object per unique Tag, instead of each Endpoint needing their own Tag object.
Storage component
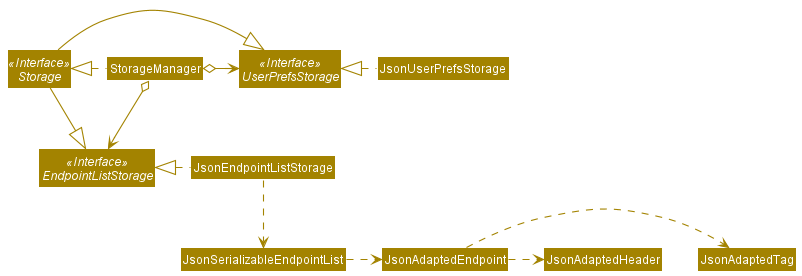
API : Storage.java
The Storage component,
- can save
UserPrefobjects in json format and read it back. - can save the Endpoint List data in json format and read it back.
Common classes
Classes used by multiple components are in the seedu.us.among.commons package.
Implementation
This section describes some noteworthy details on how certain features are implemented.
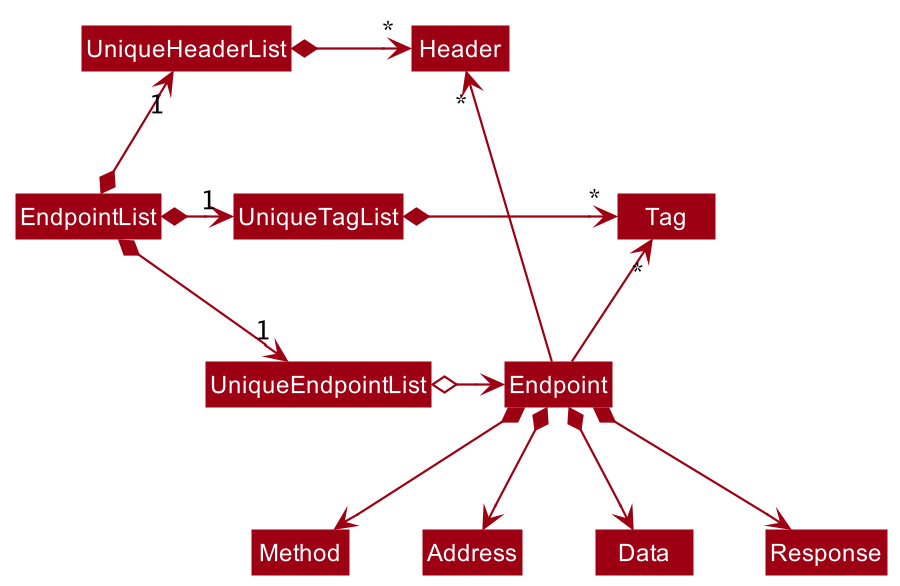
Endpoint components
- Change/Add classes in the Endpoint package to encapsulate an API endpoint.
Implementation
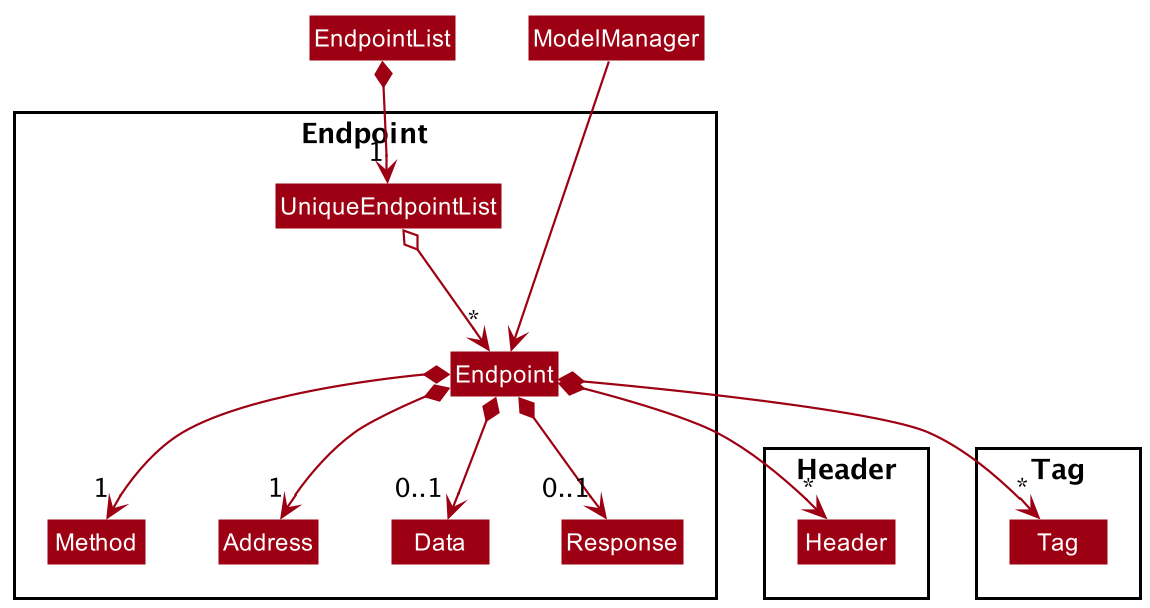
An Endpoint,
- is stored in
EndpointListof theModel - encapsulates an API endpoint
An Endpoint contains the following attributes:
- a
Method, which represents the type of request an API endpoint will send to the server - an
Address, which represents the URL address to which the API request is made - a
Data, which represents the data that is to be sent to the server when an API request is made - a Headers Set, which encapsulates a list of zero or more
Headerobjects, where eachHeaderrepresents a header that is to be sent to the server - a Tags Set, which encapsulates a list of zero or more
Tagsobjects - a
Response, which represents the response that an API receives from the server
- There are a certain set of requests that an API can make: GET, POST, PUT, DELETE, HEAD, OPTIONS, PATCH.
- A
Methodobject will always be one of the above requests -
Datarepresents the data that is to be sent to the server when an API request is made -
Datacan be empty, as some API calls do not send any data to the server - Before an API call is made, the
Responseobject will be empty - Only when a
Request#executeTimed(request)is called will aResponsecontain information about the API call response
Design consideration:
Aspect: How the components within Endpoint are added or changed
-
Current Choice: Attributes within
Endpointare immutable, meaning that if there is an attribute that has to be edited or added, a new Endpoint object has to be created.- Pros: Concept of Immutability is met, making the code less prone to bugs as all components of an Endpoint object are fixed
- Cons: Less flexible, more steps needed in creating or editing Endpoint objects
-
Alternative 1: Allow certain components within
Endpoint, likeHeaderandDatato be mutable- Pros: Less overhead as fewer objects are created
- Cons: Prone to error as a Component might not be correctly changed
Add endpoint feature
What it is
Adds an endpoint to the bottom of the list of currently existing endpoints. Users are able to add any valid endpoint to the list. If the exact same endpoint is already in the list, this command will not be allowed and an error will be shown.
Example: add -x get -u google.com
Implementation
Upon the users entry of the endpoint, the AddCommand object is created. AddCommand is a class that extends Command abstract class. AddCommand implements the execute() method from the Command abstract class whereby upon execution, the method will add the given endpoint in the model’s list of endpoints if a valid endpoint is given.
Given below is an example usage scenario and how the add command behaves at each step.
Step 1. The user launches the application and executes add -x get -u google.com to save an endpoint.
Step 2. The endpoint is added to the model.
The following sequence diagram shows how the add operation works:
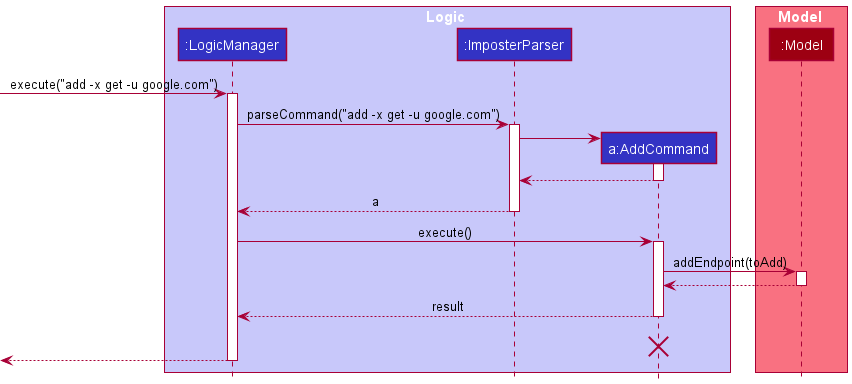
AddCommand should end at the destroy marker (X) but due to a limitation of PlantUML, the lifeline reaches the end of diagram.
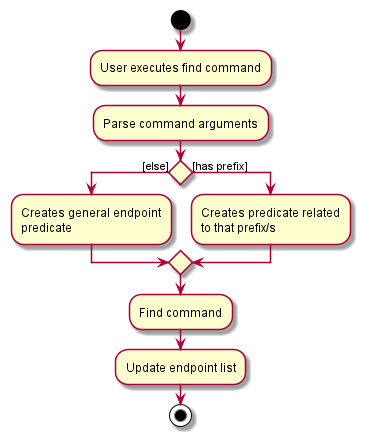
Find command feature
What it is
Looks for an endpoint in the list of endpoints and displays all the endpoints that match the requested specifications. If there are no specifications, find will do a general search through all fields that endpoint has.
Implementation
Upon the users entry of the find keyword, the parser will check if prefixes have been specified, if the user decided to specify prefixes, the FindCommand object will be created with predicates looking through the specified prefixes. Else, a general endpoint predicate that will scan through all fields of endpoint will be created. FindCommand is a class that extends Command abstract class. FindCommand implements the execute() method from the Command abstract class whereby upon execution, the method will search through the given endpoints in the model’s list of endpoints and check if any endpoints match the specifications. It will then update the model with the filtered endpoint list.
Given below is an example usage scenario and how the find command behaves at each step.
Step 1. The user launches the application and executes find -x get -u google.com to find an endpoint.
Step 2. The find command will check and see if there are any endpoints that contain the method get and the address google.com using the Model#updateFilteredEndpointList method.
Step 3. Model#updateFilteredEndpointList will be called and model will be updated.
find get will work as well, but will look through all fields instead of just one
The following activity diagram summarizes what happens when a user executes a valid find command:
Design consideration:
Aspect: How find executes
-
Alternative 1 (current choice): The
findchecks for keywords in the prefix fields, if there are no prefixes present, it will perform a general search using aEndPointContainsKeywordsPredicatewhich looks through all fields in endpoint. Else the method,ArgumentMultimap#arePrefixesPresentwill check and return a new predicate for each value after each prefix if it is present and then generate a keyword predicate that will match values in that field. Each predicate uses a partial keyword search hence, the user does not need to type in the full word for any find searches.- Pros: By abstracting out the
Predicatemethod and encapsulating the validation, these predicates can be used elsewhere if needed to match endpoints. - Cons: An extra layer of abstraction may make it harder to make quick changes if new prefixes are added.
- Pros: By abstracting out the
-
Alternative 2: Directly check for the validity of the endpoints in the find command parser without going through a predicate.
- Pros: Developers will have an easier time understanding the code and how find command works, since all of the code will be kept in find command, making changes will be easier.
- Cons: Duplication of code may occur and bad coding practices may arise due to lack of abstraction.
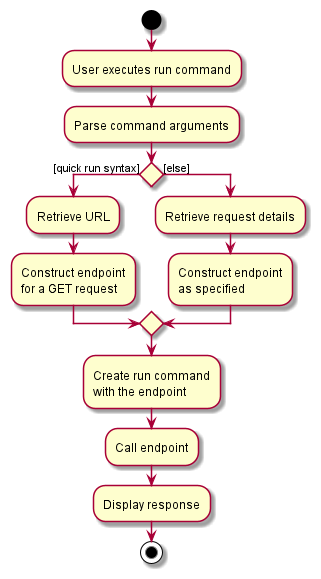
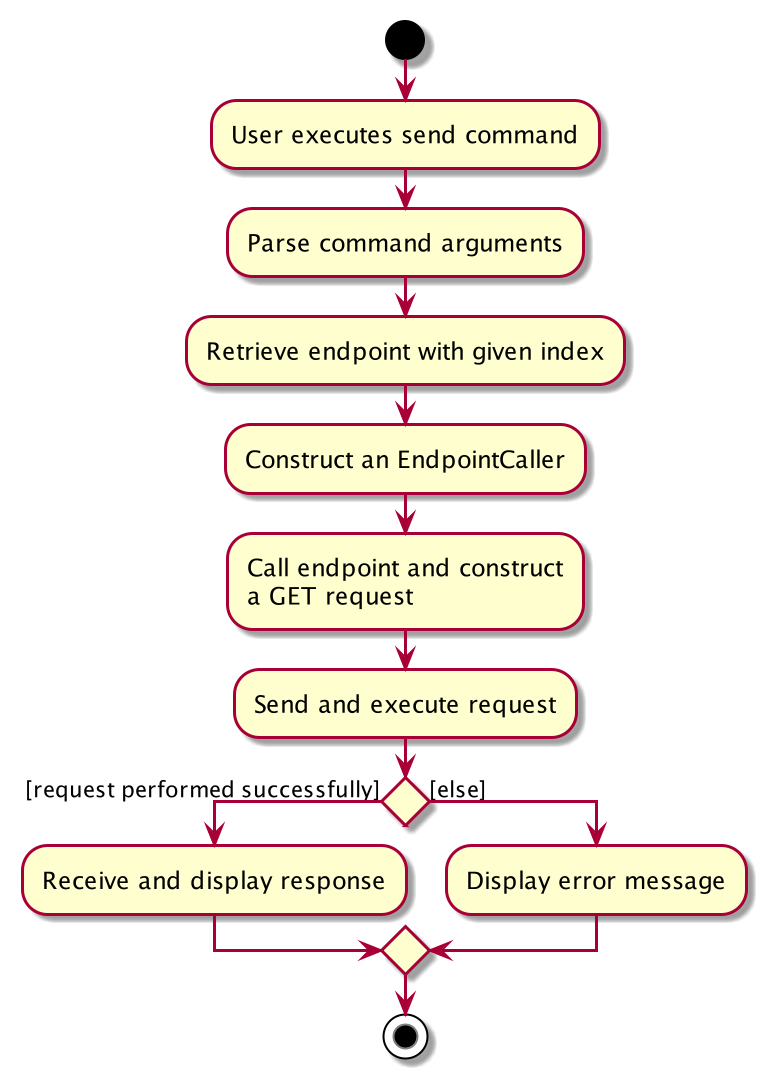
Send & run command feature
What it is
Allows the user to make a request to a specific API endpoint, either with data from a saved endpoint (send command) or values passed in from the command box (run command). The main use cases for send and run commands are as follows:
- Send: the user wants to get the latest response from the API service provider of a particular endpoint in the endpoint list. The endpoint invoked will also update its response details in the storage file.
- Run: the user wants to run a quick API request without saving. The parameters required for the API request is supplied as part of the command parameters, and the response will be displayed for inspection.
Implementation
The send and run commands both involve the invocation of an actual outbound request that is facilitated by the request package. Both commands allow users to get the latest response from an endpoint and display the result for inspection.
Given below is an example usage scenario of how the run command behaves at each step.
Step 1. The user launches the application and executes run -x get -u https://api.data.gov.sg/v1/environment/air-temperature to make a call to the specified API (which is a get request to the URL above).
Step 2. The run command parser first validates the user input. According to the format of the run command supplied, the parser retrieves the relevant endpoint details in order to construct a run command.
Step 3. The run command creates an EndpointCaller object to execute the request via EndpointCaller#callEndpoint(), sending out the HTTP request to the targeted API service provider and retrieves a response.
Step 4. The response will then be parsed and forwarded to UI for further formatting before displaying to the user.
The following sequence diagram shows how the run operation works:
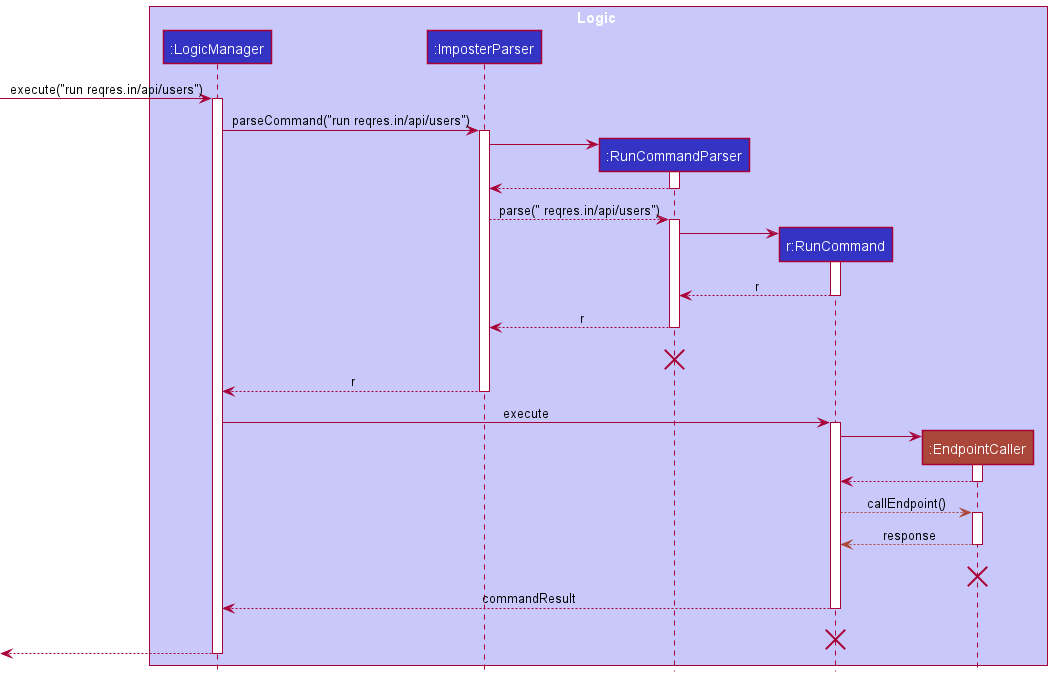
RunCommandParser, RunCommand and EndpointCaller should end at the destroy marker (X) but due to a limitation
of PlantUML, the lifeline reaches the end of diagram.
The following activity diagram summarizes what happens when a user executes a valid run command:
Design consideration:
Aspect: How run executes
-
Alternative 1 (current choice): The
runcommand parser does a primitive verification of the url via the helper methodParserUtil#parseAddress. The helper method in term invokesAddress#isValidAddressto intercept obvious non-urls provided by the user. The parser thereafter generates aruncommand with the verified input.- Pros: By abstracting out the
parseAddressmethod and encapsulating the validity of URL address in theAddressclass, the helper method can be utilised by other commands such as theaddcommand. - Cons: An extra layer of abstraction may make it harder to make quick changes to the logic in URL address verification.
- Pros: By abstracting out the
-
Alternative 2: Individual command parser checks for the url address validity by itself.
- Pros: Making it obvious to developers to view the exact steps taken in parsing the user input within each command parser.
- Cons: Duplication of code across all command parsers that require the verification of URLs, such as
addandruncommands.
Request feature
What it is
Supports the core functionality of our product which involves the sending of requests and receiving of responses from a specified endpoint. Required by the send and run command to perform API calls as requested by the user.
Implementation
The request mechanism is invoked by the EndpointCaller object when the user executes a send/run command and is facilitated by the Apache HttpComponents library. When invoked, it performs an API call to a specific endpoint and returns a response if the call is performed successfully. It supports API calls for the following methods, each represented by a class:
GETPUTPOSTDELETEHEADOPTIONSPATCH
Given below is an example usage scenario where the behaviour of request mechanism is captured in step 3.
Step 1. The user launches the application for the first time which comes with a default list of endpoints.
Step 2. The user executes send 1 command. The endpoint at the first index will then be used to generate an EndpointCaller object.
Step 3. The send command calls EndpointCaller#callEndpoint(), which in turn calls EndpointCaller#sendRequest. Next, a GetRequest object is created for the associated endpoint and its send method is invoked. Following this, a HttpUriRequest object is created and Headers and Data fields are populated with values retrieved from the endpoint. Finally, the #execute method from the abstract Request class is called and a timed execution of the API call is carried out to the targeted API service provider. A response is returned and the existing endpoint used to invoke the request will be updated with the returned response and saved into the model.
Step 4. The response retrieved will also be parsed and passed to UI for further formatting and displaying to the user.
model.setEndpoint() so the endpoint list state will not be updated or saved.
The following sequence diagram shows how the request operation works when a user executes a send command for an endpoint with a GET request:
SendCommand, EndpointCaller and GetRequest should end
at the destroy marker (X) but due to a limitation of PlantUML, the lifeline reaches the end of diagram.
The following activity diagram summarizes what happens when a user executes a send command for an endpoint with a GET request:
Design consideration:
Aspect: How request executes
-
Alternative 1 (current choice): A request class is inherited by classes representing the various types of supported HTTP request methods.
- Pros: Common operations are abstracted out into the request class which improves code reusability and is easily extensible to support new methods.
- Cons: Introduces a tightly coupled relationship between the request class and its child classes as changing the request class may affect all its child classes.
-
Alternative 2: Each HTTP request method is represented by a single class that does not inherit from a request class.
- Pros: Less coupling between the request classes where the logic for each HTTP method is handled independently.
- Cons: Common operations are repeated in each of the method class leading to significant code duplications.
Toggle command feature
What it is
Allows the user to switch between supported themes (colour palettes) within the product.
Implementation
Upon entry of the toggle command, it is parsed to check if the input theme is valid (ie. among the list of available themes). If it is valid, a ToggleCommand is created. ToggleCommand is a class that extends the Command class and hence also inherits the execute() method. When execute() is called, it will set the theme of the application to be the input theme.
Given below is an example usage scenario and how the toggle command behaves at each step.
Step 1. The user launches the application and executes toggle light to change the application theme to the light theme.
Step 2. The toggle command returns a CommandResult that triggers the updateTheme() method within MainWindow. MainWindow then finds the relevant .css file containing all theme information and applies it to all elements it contains.
The following sequence diagram shows how the toggle command works for the above example:
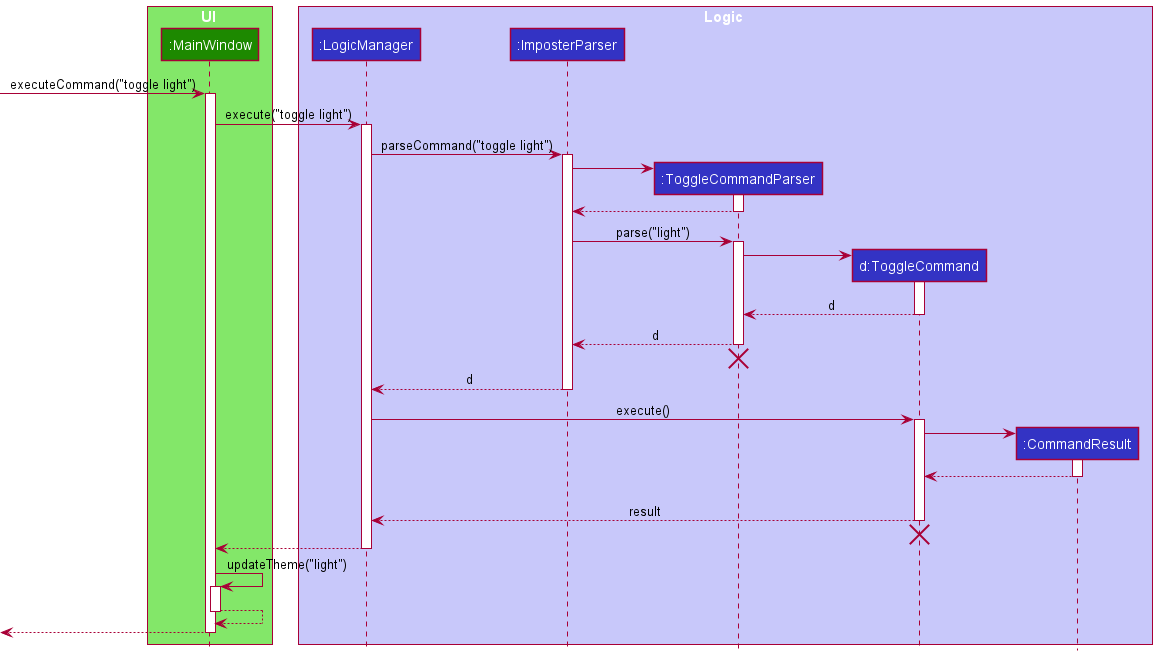
ToggleCommand, ToggleCommandParser should end at the destroy marker (X) but due to a limitation of PlantUML, the lifeline reaches the end of diagram.
Documentation, logging, testing, configuration, dev-ops
Appendix A: Product Scope
Target user profile:
- prefers a quick means of testing APIs
- can type fast and prefer typing to mouse interactions
- is a beginner in API development
- is keen to develop software products that involve APIs
- requires testing of APIs in projects or work-related tasks
- needs to learn and interact with APIs
- prefers a portable and lightweight application
Value proposition:
- beautify and highlight key metrics of API responses
- shortcuts to execute common API testing tasks
- able to save APIs for repeated execution and continuous debugging
- relevant prompts and comprehensive supporting documentations
- no need to create any account
- simple and easy to get started
- clutter free user interface
- one-step download and light on system resources
- optimised for keyboard navigation and shortcuts
- unintrusive
- great user experience
Appendix B: User Stories
Priorities: High (must have) - * * *, Medium (nice to have) - * *, Low
(unlikely to have) - *
| Priority | As a … | I want to … | So that I can… |
|---|---|---|---|
* * * |
new user | view a quick description of APIs | quickly review the basic concepts of APIs |
* * * |
long time user | test API endpoints without saving them | have a quick way to verify if an API is working |
* * * |
long time user | quickly load my previous APIs | save time and not have to type them all out again |
* * * |
new API developer | view clear error messages | quickly learn what went wrong |
* * * |
API tester | a simple user interface | quickly validate the state of an endpoint |
* * * |
new user | view a table of command summary | have a broad overview of available functionalities |
* * * |
moderate user | find/locate saved API endpoints | easily view the details of a particular endpoint |
* * * |
API developer | cancel my API call if it takes too long | proceed to verify the errors or work on another API request |
* * * |
API developer | organize my APIs by categories | easily find the ones that I want to test |
* * * |
beginner API developer | call up APIs that I have just used | quickly verify the output again after fixing bugs |
* * |
API developer | see a loading spinner when making an API call | clearly know when an API call is still in-progress or when an error has occurred |
* * |
moderate user | be able to change the application theme | make the user interface more comfortably suit my visual needs |
* * |
long time developer | have shortcuts to certain commands that I frequently use | save time typing certain commands |
* |
experienced developer | export my saved API endpoints | easily port or integrate the data with other platforms |
* |
expert user | have analysis reports of my usage | identify trends and consolidate my API testing progress |
* |
moderate user | get tips on how to optimise my usage | can have a faster and smoother workflow |
* |
experienced developer | send out multiple requests to an API endpoint concurrently | test if the API can cope under significant traffic |
* |
expert user | store my API data in the cloud | use the tester across multiple workstations |
* |
moderate user | generate bug report for the API under test | share and request bug fixes from the developers |
Appendix C: Use Cases
(For all use cases below, the System is the imPoster and the Actor is
the user, unless specified otherwise)
General Use Cases
Use case G01 - View Help
MSS
- User requests for help with using the application
- User enters
helpcommand -
imPoster returns a help page with links and command summary for the user
Use case ends.
Extensions
-
2a. The given command/format is invalid
-
2a1. imPoster shows an error message to the user
Use case resumes at step 2.
-
Use case G02 - Exit imPoster
MSS
- User requests to exit the application
- User enters
exitcommand into command box -
imPoster exits
Use case ends.
Extensions
-
2a. The given command/format is invalid
-
2a1. imPoster shows an error message to the user
Use case resumes at step 2.
-
Use case G03 - Toggle Application Theme
MSS
- User requests to toggle application theme
- User enters
togglecommand into command box -
imPoster switches to user specified application theme
Use case ends.
Extensions
-
2a. The given command/format is invalid
-
2a1. imPoster shows an error message to the user
Use case resumes at step 2.
-
-
2b. The given theme does not exist
-
2b1. imPoster shows an error message to the user
Use case resumes at step 2.
-
Endpoint Use Cases
Use case E01 - Add an API endpoint
MSS
- User requests to add an API endpoint
- User enters
addcommand -
imPoster saves the API endpoint to the API endpoint list
Use case ends.
Extensions
-
2a. The given command/format is invalid
-
2a1. imPoster shows an error message to the user
Use case resumes at step 2.
-
-
2b. Adding the endpoint results in a duplicate
-
2b1. imPoster shows a message informing the user that the desired endpoint already exist
Use case resumes at step 2.
-
Use case E02 - Edit an API endpoint
MSS
- User requests to edit an API endpoint
- User enters
editcommand -
imPoster edits the API endpoint and updates the API endpoint list
Use case ends.
Extensions
-
2a. The given command/format is invalid
-
2a1. imPoster shows an error message to the user
Use case resumes at step 2.
-
-
2b. Editing the endpoint results in a duplicate
-
2b1. imPoster shows a message informing the user that the desired endpoint already exist
Use case resumes at step 2.
-
-
2c. The given index is invalid
-
2c1. imPoster shows an error message to the user
Use case resumes at step 2.
-
Use case E03 - Remove an API endpoint
MSS
- User requests to remove an API endpoint
- User enters
removecommand -
imPoster removes the API endpoint and updates the API endpoint list
Use case ends.
Extensions
-
2a. The given command/format is invalid
-
2a1. imPoster shows an error message to the user
Use case resumes at step 2.
-
-
2b. The given index is invalid
-
2b1. imPoster shows an error message to the user
Use case resumes at step 2.
-
Use case E04 - Find a saved API endpoint
MSS
- User requests to find a saved API endpoint
- User enters
findcommand - imPoster searches the existing records
-
imPoster returns a list of matching API endpoints
Use case ends.
Extensions
-
2a. The given command/format is invalid
-
2a1. imPoster shows an error message to the user
Use case resumes at step 2.
-
-
3a. The search result comes up empty
-
3a1. imPoster shows a message informing the user that there are no endpoints found
Use case ends.
-
Use case E05 - List all saved API endpoints
MSS
- User requests to view all saved API endpoints
- User enters
listcommand -
imPoster displays all existing records
Use case ends.
Extensions
-
2a. The given command/format is invalid
-
2a1. imPoster shows an error message to the user
Use case resumes at step 2.
-
-
3a. The API endpoint list is empty
-
3a1. imPoster shows an additional message to inform the user that the endpoint list is empty
Use case ends.
-
Use case E06 - Clear all saved API endpoints
MSS
- User requests to clear all saved API endpoints
- User enters
clearcommand -
imPoster clears all existing records
Use case ends.
Extensions
-
2a. The given command/format is invalid
-
2a1. imPoster shows an error message to the user
Use case resumes at step 2.
-
Use case E07 - Call a saved API endpoint
MSS
- User requests to call a saved API endpoint
- User enters
sendcommand - imPoster makes a call to the desired API endpoint
- API call is successful and response is shown to the user
-
imPoster saves the response to a file that the user can view
Use case ends.
Extensions
-
2a. The given command/format is invalid
-
2a1. imPoster shows an error message to the user
Use case resumes at step 2.
-
-
2b. imPoster receives an invalid index
-
2b1. imPoster shows an error message to the user
Use case resumes at step 2.
-
Use case E08 - Call an API endpoint directly without saving
MSS
- User requests to call a saved API endpoint
- User enters
runcommand - imPoster makes a call to the desired API endpoint
-
API call is successful and response is shown to the user
Use case ends.
Extensions
-
2a. The given command/format is invalid
-
2a1. imPoster shows an error message to the user
Use case resumes at step 2.
-
Use case E09 - Abort an ongoing API call
Preconditions: There is an ongoing API call
MSS
- User requests to cancel a saved API endpoint
- User inputs ctrl + d through the keyboard
-
imPoster aborts the API call
Use case ends.
Extensions
-
2a. The keyboard input is invalid
-
2a1. imPoster takes no action
Use case resumes at step 2.
-
Use case E10 - View details of an API endpoint
MSS
- User requests to view the details of a saved API endpoint
- User enters
showcommand -
imPoster shows the details of the API endpoint
Use case ends.
Extensions
-
2a. The given command/format is invalid
-
2a1. imPoster shows an error message to the user
Use case resumes at step 2.
-
-
2b. The given index is invalid
-
2b1. imPoster shows an error message to the user
Use case resumes at step 2.
-
Appendix D: Non-Functional Requirements
- Should work on any mainstream OS as long as it has Java
11or above installed. - Should be able to hold up to 1000 API endpoints without a noticeable sluggishness in performance for typical usage.
- A user with above average typing speed for regular English text (i.e. not code, not system admin commands) should be able to accomplish most of the tasks faster using commands than using the mouse.
- Should feel simple and easy to use as compared to existing solutions such as Postman.
- Should be able to provide a proper response even if a call to an API endpoint fails due to third-party unavailability.
- Should not crash or throw unexpected errors when internet connection is unavailable.
- Should be able to display responses not exceeding 100000 characters from an API call without crashing or throwing unexpected errors.
Appendix E: Glossary
| Term | Description |
|---|---|
| Mainstream OS | Windows, Linux, Unix, OS-X |
| API | API is short for Application Programming Interface and allows two systems to interact with each other |
| Call | A call to an API endpoint refers to the process of sending a request to the server and then receiving a response |
| Endpoint | The communication point of a system that allows it to interact with another system, commonly accessed through a URL |
| Request | A process in which information is sent out to an endpoint through one of the request methods |
| Response | The information obtained from an endpoint after a request is sent to it |
| Parameter | Information passed in as part of a command with its type identified by a prefix (e.g. METHOD) |
| Prefix | Characters used to identify the following parameter (e.g. -x is the prefix for the parameter METHOD) |
| JSON | JSON is short for JavaScript Object Notation which is a lightweight format for data storage |
| Protocol | A protocol is a system of rules that define how data is exchanged within or between systems |
| Postman | An existing API client for developers. See more here |
Appendix F: Developer Workflow
Please checkout the workflow guide to understand the adopted approach in maintaining imPoster.
Appendix G: API definition
What is an API?
Broadly speaking, an API is an interface that enables and defines how two systems interact with one another. In a classic analogy, the interaction above is usually likened to a waiter communicating a customer order to the restaurant kitchen. In this analogy, the customer and kitchen represents the two systems and the waiter represents the API allowing them to communicate. The order and food delivered then corresponds to the terms request and response associated with an API call. The annotated diagram below captures these interactions and may aid in providing a better understanding:

Why learn about APIs?
You may be surprised to know that APIs are not only widely used in our daily lives, it is also likely that you have been using them frequently without actually noticing them! For example, the simple act of visiting a website involves an API request which is responsible for bringing back a response to you in the form of a webpage. Even a simple text message to your friend relies on an API to reliably deliver your message! The use of APIs is extensive in today’s highly connected world so even if they are completely unrelated to your job, it helps to have some basic understanding of them!
Appendix H: Instructions for Manual Testing
Given below are instructions to test the app manually.
Launch and shutdown
-
Initial launch
-
Download the jar file and copy into an empty folder.
-
Double-click the jar file.
Expected: Shows the GUI with a set of sample endpoints. The window size may not be optimum.
-
-
Saving window preferences
-
Resize the window to an optimum size. Move the window to a different location. Close the window.
-
Re-launch the app by double-clicking the jar file.
Expected: The most recent window size and location is retained.
-
-
Exiting the app
- With the app still open, enter
exitin the command box or click on the close window button.
Expected: App closes.
- With the app still open, enter
Add an endpoint
-
Add an endpoint
-
There are less than 100 endpoints in the endpoint list, and endpoint that is to be added is not the same as any currently in the list.
-
Test case:
add -x get -u https://sg.yahoo.com/?p=us
Expected: A new endpoint with theGETmethod andhttps://sg.yahoo.com/?p=usaddress is added into the endpoint list. -
Test case:
add -x get -u https://sg.yahoo.com/?p=us -t yahoo
Expected: A new endpoint with theGETmethod,https://sg.yahoo.com/?p=usaddress andyahootag is added into the endpoint list. -
Test case:
add -x get -u https://reqres.in/api/users -d {"name": "john doe", "job": "developer"} -h "key: value" -t common
Expected: A new endpoint with theGETmethod,https://reqres.in/api/usersaddress,{"name": "john doe", "job": "developer"}data,"key: value"header andcommontag is added into the endpoint list. -
Test case:
add
Expected: No endpoint is added. Error details shown in the result display, with a result message sayingInvalid command format!... -
Test case:
add -x get
Expected: No endpoint is added. Error details shown in the result display, with a result message sayingInvalid command format!... -
Test case:
add -x get -u invalidurl\\
Expected: No endpoint is added. Error details shown in the result display, with a result message sayingURL provided has to be valid... -
Test case:
add -x abc -u https://sg.yahoo.com/?p=us
Expected: No endpoint is added. Error details shown in the result display, with a result message sayingMethods only consists... -
Test case:
add -x get -u https://sg.yahoo.com/?p=us -d abc
Expected: No endpoint is added. Error details shown in the result display, with a result message sayingData must be...
-
Edit an endpoint
-
Edit an endpoint
-
Prerequisites: List all endpoints using the
listcommand. There exists at least 1 endpoint in the list, and there are less than 100 endpoints. -
Test case:
edit 1 -x get
Expected: The method of the endpoint at index 1 is changed toGETand any existing response is cleared. -
Test case:
edit 1 -u https://sg.yahoo.com/?p=us
Expected: The url address of the endpoint at index 1 is changed tohttps://sg.yahoo.com/?p=usand any existing response is cleared. -
Test case:
edit 1 -d
Expected: Any existing data of the endpoint at index 1 are removed and any existing response is cleared. -
Test case:
edit 1 -t
Expected: Any existing tags of the endpoint at index 1 are removed and any existing response is cleared. -
Test case:
edit 1 -h
Expected: Any existing headers of the endpoint at index 1 are removed and any existing response is cleared. -
Test case:
edit 1 -x POST -u https://reqres.in/api/users -d {"name": "john doe", "job": "developer"} -t common -t important
Expected: The method of the endpoint at index 1 is change toPOST, its url addresss is changed tohttps://reqres.in/api/users, its data is changed to{"name": "john doe", "job": "developer"}and its tags are changed tocommonandimportantand any existing response is cleared. -
Test case:
edit
Expected: No endpoint is edited. Error details shown in the result display, with a result message sayingInvalid command format!... -
Test case:
edit 0
Expected: No endpoint is edited. Error details shown in the result display, with a result message sayingAn index must be specified...
Other incorrect edit commands to try:edit x(where x is a number that is less than or equal to zero or greater than the maximum integer size). -
Test case:
edit 10
Expected: No endpoint is edited. Error details shown in the result display, with a result message sayingAt least one parameter to edit must be provided.
Other incorrect edit commands to try:edit x(where x is larger than the list size, and is a positive integer that is less than the maximum integer size). -
Test case:
edit 1 -x abc
Expected: No endpoint is edited. Error details shown in the result display, with a result message sayingMethods only consists... -
Test case:
edit 1 -d abc
Expected: No endpoint is edited. Error details shown in the result display, with a result message sayingData must be... -
Test case:
edit 1 -h abc
Expected: No endpoint is edited. Error details shown in the result display, with a result message sayingHeaders should be...
-
Show an endpoint
-
Show the details of a selected endpoint from the endpoint list in the result display
-
Prerequisites: There exists at least one (but less than 100) endpoints in the endpoint list.
-
Test case:
show 1
Expected: Details of the first endpoint in the endpoint list is shown in the result display. -
Test case:
show
Expected: Error details shown in the result display, with a result message sayingInvalid command format!.... -
Test case:
show 0
Expected: Error details shown in the result display, with a result message sayingAn index must be specified....
Other incorrect show commands to try:show -1,show one -
Test case:
show 100
Expected: Error details shown in the result display, with a result message sayingIndex provided is not within....
Other incorrect remove commands to try:show 101,show 999
-
Find an endpoint
-
Find an endpoint (General Search)
-
Prerequisites: None, but if the list is empty, all searches will also lead to no results.
-
Test case:
find get
Expected: Looks through all fields for any partial or full word ofgetthen displays them on the endpoint list.
E.g.getfrom any field will be matched. -
Test case:
find g
Expected: Looks through all fields for any partial or full word ofgthen displays them on the endpoint list.
E.g.gofrom any field will be matched. -
Test case:
find get post
Expected: Looks through all fields for any partial or full word ofgetorpostthen displays them on the endpoint list.
E.g.getorpostfrom any field will be matched. (ORsearch). -
Test case:
find 123 post
Expected: Looks through all fields for any partial or full word of123orpostthen displays them on the endpoint list.
E.g.123orpostfrom any field will be matched. (ORsearch). -
Test case:
find
Expected: No endpoint is found. Error details shown in the result display, with a result message sayingInvalid command format!... -
Test case:
find0
Expected: No endpoint is found. Error details shown in the result display, with a result message sayingUnknown command
-
-
Find an endpoint (Precise Search)
-
Prerequisites: None, but if the list is empty, all searches will also lead to no results.
-
Test case:
find -x get
Expected: Looks through the method field for any partial or full word ofgetthen displays them on the endpoint list.
E.g.getfrom the method field will be matched. -
Test case:
find -x get -u yahoo
Expected: Looks through the method field for any partial or full word ofgetand the address field for any partial or full word ofyahoothen displays them on the endpoint list.
E.g. Bothgetfrom the method field andyahoofrom the address field must be present to be matched. (ANDsearch between multiple prefixes) -
Test case:
find -h key -d name
Expected: Looks through the header field for any partial or full word ofkeyand the data field for any partial or full word ofnamethen displays them on the endpoint list.
E.g. Bothkeyfrom the method field andnamefrom the address field must be present to be matched. (ANDsearch between multiple prefixes) -
Test case:
find -x get post
Expected: Looks through the method for any partial or full word ofgetorpostthen displays them on the endpoint list.
E.g.getorpostfrom the method field will be matched. (ORsearch within one prefix). -
Test case:
find -x get post -u yahoo
Expected: Looks through the method for any partial or full word ofgetorpostand the address field for any partial or full word ofyahoothen displays them on the endpoint list.
E.g.getorpostfrom the method field andyahoofrom the address field will be matched. (ORsearch within one prefix andANDsearch between multiple prefixes). -
Test case:
find -x
Expected: No endpoint is found. Error details shown in the result display, with a result message sayingInvalid command format!... -
Test case:
find -x get -x post
Expected: Looks through the method field for any partial or full word ofpostthen displays them on the endpoint list. (Ignores the first instance of -x)
E.g.postfrom the method field will be matched.
-
Remove an endpoint
-
Remove an endpoint while all endpoints are being shown
-
Prerequisites: List all endpoints using the
listcommand. There exists multiple endpoints in the list, and there are less than 100 endpoints. -
Test case:
remove 1
Expected: First endpoint is deleted from the list. Details of the deleted endpoint shown in the result display. -
Test case:
remove
Expected: No endpoint is deleted. Error details shown in the result display, with a result message sayingInvalid command format!... -
Test case:
remove 0
Expected: No endpoint is deleted. Error details shown in the result display, with a result message sayingAn index must be specified...Other incorrect remove commands to try:remove x(where x is a number that is less than or equal to zero or greater than the maximum integer size). -
Test case:
remove 100
Expected: No endpoint is deleted. Error details shown in the result display, with a result message sayingIndex provided is not within...Other incorrect remove commands to try:remove x(where x is larger than the list size, and is a positive integer that is less than the maximum integer size).
-
List all endpoints
-
List all endpoints
-
Prerequisites: There exists multiple endpoints in the list.
-
Test case:
list
Expected: All endpoints are shown in the endpoint list, with a result message sayingListed all saved....
-
-
List all endpoints from the endpoint list after a
findcommand-
Prerequisites: List all endpoints using the
listcommand. There exists multiple endpoints in the list. Perform afindcommand such that the endpoint list shows less than actual number of endpoints. -
Test case:
list
Expected: Filter from thefindwill be cleared and all endpoints are shown in the endpoint list, with a result message sayingListed all saved....
-
-
List all endpoints from the endpoint list after a
clearcommand-
Prerequisites: List all endpoints using the
listcommand. There exists multiple endpoints in the list. -
Perform a
clearcommand such that all endpoints are cleared from the endpoint list. -
Test case:
list
Expected: No endpoints are shown in the endpoint list, with a result message sayingIt seems like your list is empty!....
-
Clear all endpoints
-
Clear all endpoints from the endpoint list
-
Prerequisites: None
-
Test case:
clear
Expected: All endpoints are cleared from the list. -
Test case:
clear 123
Expected: All endpoints are cleared from the list.
-
Call a saved endpoint
-
Call a saved endpoint while all endpoints are being shown
-
Prerequisites: List all endpoints using the
listcommand. There exists at least 1 endpoint in the list, and there are less than 100 endpoints. -
Test case:
send 1
Expected: First endpoint is called from the list. Details of the response is shown in the result display. -
Test case:
send
Expected: No endpoint is called. Error details shown in the result display, with a result message sayingInvalid command format!... -
Test case:
send 0
Expected: No endpoint is called. Error details shown in the result display, with a result message sayingAn index must be specified...
Other incorrect remove commands to try:send x(where x is a number that is less than or equal to zero or greater than the maximum integer size). -
Test case:
send 100
Expected: No endpoint is called. Error details shown in the result display, with a result message sayingIndex provided is not within...
Other incorrect remove commands to try:send x(where x is larger than the list size, and is a positive integer that is less than the maximum integer size).
-
Call an endpoint (without saving)
-
Call an endpoint directly
-
Prerequisites: None
-
Test case:
run -x get -u https://google.com
Expected: Endpoint is called successfully. Details of the response is shown in the result display. -
Test case:
run https://google.com
Expected: Endpoint is called successfully. Details of the response is shown in the result display. -
Test case:
run -x POST -u https://reqres.in/api/users -d {"name": "john doe", "job": "developer"}
Expected: Endpoint is called successfully. Details of the response is shown in the result display.. -
Test case:
run
Expected: No endpoint is called. Error details shown in the result display, with a result message sayingInvalid command format!... -
Test case:
run https://thisisarandomanyhowlink.com
Expected: No endpoint is called. Error details shown in the result display, with a result message sayingConnection could not be established.
Other incorrect remove commands to try:run x(where x is any URL whose connection cannot be established).
-
Saving data
-
Saving endpoints between sessions
-
Launch the app.
-
Save an endpoint with a valid
addcommand. Confirm the endpoint has been saved by checking its existence at the end of the list of saved endpoints. -
Close the app.
-
Re-launch the app by double-clicking the jar file.
Expected: The new endpoint is still present at the end of the list of saved endpoints.
-
-
Dealing with corrupted/missing data files
-
Prerequisite: Have opened and closed the application and confirmed that the files
preferences.jsonanddata/imposter.jsonhave been created in the same directory that imPoster was run from. -
Manually edit any of the aforementioned files with any text editing software to break the JSON format. For example, removing the opening curly brace of the JSON file. Alternatively, you may delete these files.
-
Re-launch the app by double-clicking the jar file.
-
Test case:
data/imposter.jsonwas corrupted.
Expected: The app starts with a list of saved endpoints (on the left) that is empty. -
Test case:
data/imposter.jsonwas deleted.
Expected: The app starts with the default list of saved endpoints. -
Test case:
preferences.jsonwas corrupted/deleted.
Expected: The app starts with the default theme, window size and location.
-
Toggle the theme
-
Toggle the theme
-
Test case:
toggle imposter
Expected: Theme changes to theimpostertheme. -
Test case:
toggle material
Expected: Theme changes to thematerialtheme. -
Test case:
toggle dark
Expected: Theme changes to thedarktheme. -
Test case:
toggle light
Expected: Theme changes to thelighttheme. -
Test case:
toggle
Expected: Theme is not changed. Error details shown in the result display, with a result message sayingInvalid command format!.... -
Test case:
toggle abc
Expected: Theme is not changed. Error details shown in the result display, with a result message sayingYou may only toggle to supported themes....
-
Opening help window
-
Opening help window
-
Test case:
help
Expected: Help window with command examples and helpful links appears. -
Test case:
help thisisarandomstring
Expected: Help window appears.
-
Appendix I: Effort
| Features | AB3 | imPoster |
|---|---|---|
| Effort | 10 | 23 |
| Lines of Code | 6k | 14k |
Logic
The Logic of imPoster was evolved to become more complex than that of the original address book. While for the AB3, its core functionality focused on adding and maintaining of contacts, imPoster took it a step further by requiring support for the sending and receiving of requests and responses.
As such, to provide for this new functionality, on top of refactoring the Person model into an Endpoint, the logic for calling an endpoint also had to be written from scratch. As there were numerous approaches that can be taken to include this logic, experimenting to find the best approach turned out to be a long process that took significant time and effort as we also had to look out for possible issues that may arise from regressions.
Eventually, we settled with an implementation that involved having to make an API call on a thread as well as used a GIF to indicate an API call in-progress. Such an approach was undertaken after we realised that extended API calls had the tendency to freeze up the UI of the application and is just one of the many issues that we had to resolve and adapt to along the way.
The implementation of this request feature is also done in an OOP fashion, where the request logic is abstracted out in a Request class and then inherited by subclasses which represent the different HTTP request methods.
UI
The UI of imPoster was evolved to be slightly more complex than that of the original address book. This is because due to the nature of our application (which involved the receiving of API responses), we needed a much larger result display that was able to show more information.
As none of our team members had any experience with JavaFX prior to this module, tampering around with the UI required significant effort. The UI also had to be frequently revisited as we continued with other aspects of implementation for our project. For example, when the request feature was being worked on, a GIF had to be shown to the user to indicate an API call in-progress, along with a GIF that accompanied error messages. On top of that, additional prettifying of JSON responses also had to be done for information to be shown neatly to the users. To prevent cluttering of the result display, several information were also chosen to be displayed as smaller neat tags at the top of the result display panel.
Eventually, the team got more comfortable with working on the UI and to that end, an easily extensible feature was also implemented for the UI through the toggle command (which supported the switching of application theme for our users). The implementation of the toggle command allowed for new themes to be added through merely adding the name of the new theme in an enum as well as its corresponding css file.